Next screen after 'Firmware ver' is MIDI Speed:
<MIDI Speed    >
<     USB+MIDI >
(Atmeg (old) based MegaDrum only) It can be set to "USB+MIDI", "USB only 1", "USB only 2", "USB only 3". "USB+MIDI" uses standard 31.25k MIDI speed and is compatible with older PIC USB MIDI firmware. "USB only 1", "USB only 2" and "USB only 3" switches the speed to 125k, 187.5k and 250k. Depending on the PCB and soldering quality and chips samples not all "USB only x" will work properly. Switching to higher speeds will only work with a newer version (21/04/2011) of PIC USB MIDI firmware. Switching to higher USB MIDI speeds reduces overall latency over USB by 0.5-1.5ms.
This is a Global setting so when you change this setting it is only saved in no-volatile (EEPROM) memory when you exit the Menu. So, as a consequence, if you change it and switch MegaDrum off straight away to test it without exiting the Menu, it will revert to a previous state before the change.
Next screen is AutoLoad Config:
<AutoLoad Conf >
<          No  >
When set to Yes, MegaDrum will automatically load last saved/loaded config and drum map upon powering up. You can by pass auto loading config even if you set it to Yes by hold the key RIGHT while switching MegaDrum on. It will then load default settings.
This is a Global setting so when you change this setting between Yes and No the setting is only saved in no-volatile (EEPROM) memory when you exit the Menu. So, as a consequence, if you change it and switch MegaDrum off straight away to test it without exiting the Menu, it will revert to a previous state before the change.
Next screen is AltEncoders:
<AltEncoders   >
<          No  >
MegaDrum can be used with two types of rotary encoders - one with one pulse per detent, another with two pulses per detent. For encoders with one pulse per detent set AltEncoders to No, for encoders with two pulses per detent set AltEncoders to Yes. Before the encoders can function properly you first need to set AltEncoders to a proper value with buttons only.
This is a Global setting so when you change this setting between Yes and No the setting is only saved in no-volatile (EEPROM) memory when you exit the Menu. So, as a consequence, if you change it and switch MegaDrum off straight away to test it without exiting the Menu, it will revert to a previous state before the change.
Next screen is MaxInputs:
<MaxInputs     >
<           56 >
Here you can set the maximum number of inputs used. The lower the MaxInputs the more Configs/DrumMaps you can save in non-volatile memory but it will limit you to the number of inputs set here. When you change MaxInputs to a new number don't try to load Configs/Drum Maps saved previously - it can cause MegaDrum to misbehave.
This is a Global setting so when you change this setting it is only saved in no-volatile (EEPROM) memory when you exit the Menu. So, as a consequence, if you change it and switch MegaDrum off straight away to test it without exiting the Menu, it will revert to a previous state before the change.
Next screen is ConfigNamesEn:
<ConfigNamesEn >
<           No >
Enables/disables support for editable Custom Nonfig Names. Default is No (disabled). When set yo Yes, it enables support for editable Custom Config Names and in this case MegaDrum uses more internal non-volatile (EEPROM) memory for storing each Config thus reducing the number of Configs/Drum Maps which can be saved. Custom Config Names themselves can only be changed via SysEx messages, e.g. using MegaDrum Manager.
This is a Global setting so when you change this setting it is only saved in no-volatile (EEPROM) memory when you exit the Menu. So, as a consequence, if you change it and switch MegaDrum off straight away to test it without exiting the Menu, it will revert to a previous state before the change.
Next screen is CustomNamesEn:
<CustomNamesEn >
<           No >
Enables/disables support for editable Custom Pads Names. Default is No (disabled). When set yo Yes, it enables support for editable Custom Pads Names and in this case MegaDrum uses more internal non-volatile (EEPROM) memory for storing each Config thus reducing the number of Configs/Drum Maps which can be saved. Custom Pads Names themselves can only be changed via SysEx messages, e.g. using MegaDrum Manager. The editable Custom Pads names are available as last 32/16/2 names in PadName->Name selection list. The number of available editable Custom Pads Names depends on a chip used: STM32/Atmega1284 - 32 editable custom pads names, Atmega644 - 16, Atmega32/324 - 2.
This is a Global setting so when you change this setting it is only saved in no-volatile (EEPROM) memory when you exit the Menu. So, as a consequence, if you change it and switch MegaDrum off straight away to test it without exiting the Menu, it will revert to a previous state before the change.
Next screen is MIDI2ForSySex:
<MIDI2ForSySex >
<           No >
(STM32 based MegaDrum only) When set to Yes the second USB MIDI Port will transmit only SySex messages. Default is No. This is implemented to prevent MIDI softs/synths listening on all MIDI ports from receiving the same Note On/Off messages twice.
This is a Global setting so when you change this setting it is only saved in no-volatile (EEPROM) memory when you exit the Menu. So, as a consequence, if you change it and switch MegaDrum off straight away to test it without exiting the Menu, it will revert to a previous state before the change.
Next screen is Load ROM Kit and Load ROM Map:
<Load ROM Kit  >
<           No >

<Load ROM Map  >
<           No >
Loading predefined Kits/Drum Maps intended for MegaDrum newcomers to get a quick start.
As of now there are 3 predefined kits/maps: Default, Basic and Advanced.
Basic and Advanced kits/maps are developed by Anders ( angr77) to match Addictive Drums MegaDrum map and Anders' reference Basic and Advanced kits.
Next screen is CurrentConfig:
<CurrentConfig >
<           1  >
Shows currently loaded/saved config used by MegaDrum.
Next screen is Save Config:
<Save Config   >
<           No >
When on this screen you can save your current MegaDrum configuration into non-volatile memory. You can save several configurations into different memory slots. The number of Config slots depends on a type of MCU (STM32/Atmega1284/Atmega644) and the number of inputs set in MaxInputs. Select a slot you want to save the configuration into with keys UP/DOWN and then press the key RIGHT. After a few seconds it will show 'Done' indicating that the configuration has been saved.
Next screen is Load Config:
<Load Config   >
<           No >
When on this screen you can load a previously saved MegaDrum configuration from non-volatile memory. Select a slot you want to load the configuration from with keys UP/DOWN and then press the key RIGHT. After a few seconds it will show 'Done' indicating that the configuration has been loaded.
Next screen is Save DrumMap:
<Save DrumMap  >
<           No >
When on this screen you can save the current drum map into non-volatile memory. Drum map is a mapping (matching) between pad inputs and notes assigned to those pads. Select a slot you want to save the drum map to with keys UP/DOWN and then press the key RIGHT. After a few seconds it will show 'Done' indicating that the drum map has been saved. The number of DrumMap slots depends on a type of MCU (STM32/Atmega1284/Atmega644) and the number of inputs set in MaxInputs.
Next screen is Load DrumMap:
<Load DrumMap  >
<           No >
When on this screen you can load a previously saved drum map from non-volatile memory. Select a slot you want to load the drum map from with keys UP/DOWN and then press the key RIGHT. After a few seconds it will show 'Done' indicating that the drum map has been loaded.
Next screen is SysEx ChainID:
<SysEx ChainID >
<            0 >
When you use MegaDrumManager to control MegaDrum and have two (more?) modules chained together over MIDI ports, you must assign different ChainIDs to each module to be able to control each unit individually. Default ChainID is 0.
Next screen is Send ConfSysex:
<Send ConfSysex>
<              >
From this screen you can manually force MegaDrum to send the full current configuration as a set of SysEx MIDI messages. You may want to do it if you cannot use MegaDrumManager and need to save the configuration externally using e.g. MIDI-OX. You can later send the whole set of SysEx MIDI messages back to MegaDrum, e.g. again using MIDI-OX, to apply saved configuration. While in this screen press the key UP to send the configuration.
Next screen is MIDIThru Enbld:
<MIDIThru Enbld>
<           No >
Enable/disable MIDI Thru. By default it is set to No (disabled). When enabled MegaDrum will send out all MIDI messages it receives over MIDI.
Next screen is NoteOff Delay:
<NoteOff Delay >
<          200 >
This setting configures how many milliseconds should pass before a Note Off MIDI message is sent after a previous Note On message. Can be set between 20 and 2000 milliseconds (0.02 - 2 seconds).
Next screen is PressRoll Time:
<PressRoll Time>
<            0 >
Maximum time out in milliseconds between consecutive hits for "pressroll" detection. If a next hit follows a previous hit in less than this time out then the note value for the hit will be taken from PNote (PBNote for 3rd zones) rather than from Note or ANote (BNote or ABNote for 3rd zones). Can be set between 0 and NoteOff Delay value.
Next screen is Latency:
<Latency       >
<           40 >
This setting should have probably be called something like Group scan frequency. Internally MegaDrum scans all inputs every 10-30 microseconds for presence of signals. Then, very simplified, every <Latency> period MegaDrum scans inputs states to see if any of the inputs registered signals and sends MIDI messages for triggered inputs. Lowering this setting will reduce latency and may degrade level detection precision. Raising this setting may improve level detection precision and will increase latency. Latency can be changed between 10 and 100 which corresponds to 1 and 10 milliseconds. Default is 40 - 4 millisecond. Also when it is set to an odd value (e.g. 21, 23, 25 and so on) it enables a visual cue to see if pads Thresholds are set too low - when a pad is hit lightly but not enough to exceed Threshold level the VU meter for the pad set to a maximum but no MIDI signal is sent and the LED stays off. If VU meters start to go off without pads being hit then Thresholds for corresponding inputs are set too low.
Next screen is OctaveShift:
<OctaveShift   >
<           No >
It is used to make MegaDrum display all notes names in a desired octave. By default it is set to 2 (maximum value). As an example, with the default OctaveShift the default Kick note (36) will sbe shown as from octave 2.
Next screen is Big VU Meter:
<Big VU Meter  >
<           No >
When set to No (default) each of 32 blocks on an LCD is used as an individual VU meter for every input. The resolution of each of these small VU meters is 16, i.e. one bar per 16 adjacent MIDI levels giving 8 bars for 128 MIDI levels. The resolution of the Big VU Meter is much better, approximately 100 bars for 128 MIDI levels. The next, 'Big VU Split', option determines what is shown in the big VU meter.
Next screen is Big VU Split:
<Big VU Split  >
<           No >
When set to No (default) (and Big VU Meter is set to Yes) the whole top row of the LCD is dedicated to HiHat pedal position and the whole bottom row of the LCD shows hit levels from all inputs on a big single VU meter.
When set to Yes (and Big VU Meter is set to Yes) the whole top row shows hit levels from all even (Head/Bow) inputs and the whole bottom row of the LCD shows hit levels on odd (Rim/Edge) inputs. The HiHat pedal position is not shown in this mode.
Next screen is Quick Access:
<Quick Access  >
<           No >
When set to Yes you can quickly jump between inputs in the Menu rather than navigate to each input using LEFT/RIGHT keys. First enter the Menu, then press the HiHat pedal and then hit a pad you want to configure. Whenever you hit another pad while still holding the HiHat pedal pressed and still in the Menu, it will jump to the last hit pad input. You have to make a Splash (quickly press/release the pedal) twice for Quick Access to become effective.
When set to No you can quickly load next/previous drum map by pressing keys UP/DOWN while not in the Menu and holding the HiHat pedal pressed. May be useful for live performances to quickly load different drum maps?
Next screen is TriggeredInCC:
<TriggeredInCC >
<           No >
When set to Yes and you hit a pad, MegaDrum will send a special MIDI CC message telling exactly which input was triggered. This option allows MegaDrum Manager (MDM) or MDCommander to quickly switch between inputs configs.
Next screen is AltFalseTrSupp:
<AltFalseTrSupp>
<           No >
When set to Yes, MegaDrum uses alternative (old) algorithm for false triggering suppression which was the default algorithm in firmware versions before the version 20110703. It has an effect on XTalk/Rettriger/DynLvl/DynTime settings.
Next screen is InputsPriority:
<InputsPriority>
<           No >
When set to Yes the first 3/4th of Head/Bow inputs are given slightly higher priority (sampled more often) then the rest of inputs.
Next screen is AltNoteChoking:
<AltNoteChoking>
<           No >
When set to Yes, AltNote from inputs settings is used for cymbals choking instead of Aftertouch. When the choke switch is pressed, MegaDrum will send Note On with AltNote note and when the switch is released MegaDrum will send Note Off with AltNote note.
Next screen is NoiseFilter:
<NoiseFilter   >
<            5 >
(STM32F205 based MegaDrum only). Noise Filtering level. Default is set 5. Setting it too high may have negative effect on Positional sensing.
Next screen is PositionalIn:
<PositionalIn  >
<     SnareH 4 >
Selects which input the further 3 positional sensing settings (PositionalLv, PositionalLow, PositionalHi) are to be configured for. You can choose SnareH (4), RideH (6), CrushH (8) or Tom1H(10) here.
Next screen is PositionalLv:
<PositionalLv  >
<           No >
Enables/disables Positional Sensing (PS) on a selected input. By default it is disabled. To enable PS on a selected input set Positional to 1, 2 or 3 (corresponding to three variations of PS). The next two settings, PositionalLow and PositionalHigh, need to be adjusted for the best PS accuracy. PositionalLow and PositionalHigh are adjusted so that to get a full range of detected positions (and MIDI CC messages) from a rim (PositionalLow) to a centre (PositionalHigh).
The default PositionalLow and PositionalHigh are good starting values for Roland PD-125X with Positional set to 1.
When Positional set to 2 the good starting values for Roland PD-125x are ~16 and ~30. With Positional set to 2, MinScan must be set so that to cover a full half wave which is ~30-40 (3-4ms) for Roland PD-125X.
Positional set to 3 is almost the same as 2 but with slightly different algorithm so you may need to set PositionalLow and PositionalHigh slightly higher.
With PS enabled and LCD showing one of the PS settings, when hitting the snare you can see in the botom left of the LCD the relative position of the hit as calculated by MegaDrum: ^ symbol shown more to the left for centre hits and more to the right for close to rim hits. You will also see the calculated PS value of the hit for currently selected PS algorithm (1, 2 or 3) which you should use for setting PositionalLow and PositionalHi properly.
As experimental feature it may or may not work for you. There are a few requirements:
- it may work only with mesh type pads with a centrally positioned piezo.
- the pad must not be too hot. If it is too hot it must be "cooled" with a voltage divider.
- the first half wave of a signal from a pad should be positive, e.g my Pintech mesh snare is such a pad. Most of other mesh pads out there, like Roland, Drumtec and etc, produce a negative first half wave. In this case you will have to use a full wave precision rectifier. See http://www.megadrum.info/forums/viewtopic.php?f=3&t=1215 for details.
Next two screens are PositionalLow and PositionalHi:
<PositionalLow >
<            10>

<PositionalHi  >
<            20>
Use these two settings to adjust PS accuracy as described in the previous screen.
Next screen is Set All Chnnls:
<Set All Chnnls>
<           No >
Use this screen to globally change MIDI channels on all inputs. Press UP/DOWN to choose a MIDI channel and then press RIGHT to apply this setting to all inputs.
Next screen is Set All Curves:
<Set All Curves>
<           No >
Use this screen to globally change velocity curves on all inputs. Press UP/DOWN to choose a velocity curve and then press RIGHT to apply this setting to all inputs.
Next screen is Set All Ccross:
<Set All Cross >
<           No >
Use this screen to globally change Crosstalk(XTalk) levels on all inputs. Press UP/DOWN to choose a Crosstalk level and then press RIGHT to apply this setting to all inputs.
Next screen is Set All EdgeSw:
<Set All EdgeSw>
<           No >
Use this screen to automatically set Threshold on all inputs which are configured as 'Switch' type for all 2 and 3 zone pads/cymbals. Press UP/DOWN to change it to Yes, then press RIGHT and it will then show 'Working'. Now hit a few times edge zones of all piezo/switch and piezo/switch/switch pads/cymbals. When done, press any button to finish. Note, that you must use only this option to set both Edge and Bell Threshold for Roland style 3 way cymbals.
Next screen is Set All BellSw:
<Set All BellSw>
<           No >
Use this screen to automatically set BThreshold on all inputs which are configured as 'Switch' for all 3 zone Yamaha style pads/cymbals. Press UP/DOWN to change it to Yes, then press RIGHT and it will then show 'Working'. Now hit a few times bell zones of all piezo/switch/switch pads/cymbals. When done, press any button to finish.
Next screen is Set All Thres:
<Set All Thres >
<           No >
Use this screen to globally change Threshold on all inputs. Press UP/DOWN to choose a Threshold and then press RIGHT to apply this setting to all inputs.
Next screen is Set All Retrs:
<Set All Retrs >
<           No >
Use this screen to globally change Rettrigger time on all inputs. Press UP/DOWN to choose Retrigger time and then press RIGHT to apply this setting to all inputs.
Next screen is Set All MinScn:
<Set All MinScn>
<           No >
Use this screen to globally change Minimum scan (MinScan) time on all inputs. Press UP/DOWN to choose Minimum scan time and then press RIGHT to apply this setting to all inputs.
Next screen is Set All DynLvl:
<Set All DynLvl>
<           No >
Use this screen to globally change Dynamic Threshold level (DynLevel) on all inputs. Press UP/DOWN to choose a Dynamic Threshold level and then press RIGHT to apply this setting to all inputs.
Next screen is Set All DynTim:
<Set All DynTim>
<           No >
Use this screen to globally change Dynamic Threshold Decay time (DynTime) on all inputs. Press UP/DOWN to choose Dynamic Threshold Decay time and then press RIGHT to apply this setting to all inputs.
Next screen is CustomCurve1/2/3/4/5/6/7/8/9/10/11/12/13/14/15/16:
<CustomCurve1  >
<P1:         2 >
Here you can configure 16 custom curves which you can use in Curve settings of pads. Each custom curve has 9 sub menus P1-P9. Each of P1-P9 represents a midpoint for setting a relation of input signals to output value where P1 is a weakest possible input signal and P9 is a highest input signal. By default the 4 custom curves are copies of Linear, Log, Exp and S type curves.
Here is a graphical demonstration for 3 examples - Log, Exp and S type curves:
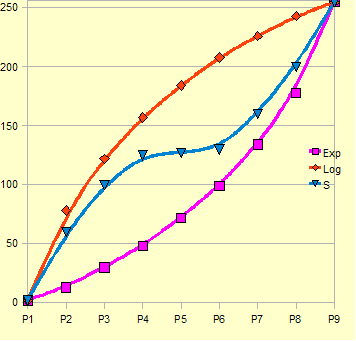
For the Log curve in the example P1-9 midpoints values are:
2 78 122 157 184 208 226 243 255
For the Exp curve in the example P1-9 midpoints values are:
2 13 30 48 72 99 134 178 255
For the S curve in the example P1-9 midpoints values are:
2 60 100 125 127 130 160 200 255
The minimum value for any midpoint is 2 which will translate into a MIDI velocity level 1
The maximum value for any midpoint is 255 which will translate into a MIDI velocity level 127
Next screen is All Gains Low:
<All Gains Low >
<           No >
(Atmega (old) based MegaDrum only). Not used on newer ARM versions. Setting this to Yes will disable all individual input Gain levels and make Gain even lower than 'Gain Level' 0. It could be used if all your pads are 'hot' and to get a better dynamic range with such pads.
Next screen is AltSamplingAlg:
<AltSamplingAlg>
<           No >
(STM32F205 based MegaDrum only). Enable/disable Alterantive Sampling algorithm (AltSamplingAlg setting) on MegaDrum with the latest STM32F205RCT6 MCU. The new algorithm reduces digital noise and may allow you to set Thresholds lower and as a result it may improve sensitivity.